
You’ve got 200 SKUs to shoot by Friday, a phone camera, and a corner of the warehouse that kinda looks clean if you crop tight. Welcome to ecommerce product photography in 2026—where “professional studio shots” means whatever you can pull off before the listing goes live.
Hi, I’m Millie. I’ve spent way too many nights zooming into bottle edges at 400% in Photoshop, feathering masks until my wrist hurts, all to make a $12 phone case look like it belongs on a white background. There’s a faster way now, and it doesn’t involve buying a light tent or learning advanced layer compositing.
In this PromeAI workflow guide, I’ll walk you through the exact 3-step process we use to turn flat product photos into clean studio shots—background removal, relighting, platform-ready export—usually in under a minute per image.
The 3-Step Studio Shot Workflow
Here’s the exact loop we’ve been running for clean catalog shots:
- Remove the background
- Relight the product like a studio shot
- Export in the right format and size for your platform
We’ll use PromeAI’s background remover and Relight for this.
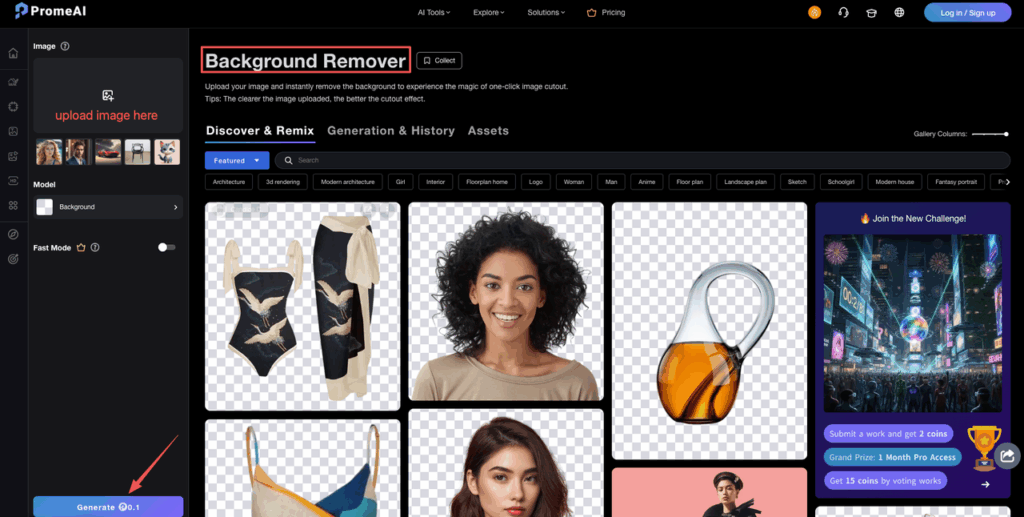
Step 1: Background removal
We start on the Background Remover tool with a simple product shot on any messy surface.
Our usual setup:
- Input: Single product, shot on phone or DSLR
- Background Remover Mode: Standard
- Target: Clean white or light gray base
Workflow:
- Upload the raw image to Background Remover.
- Let the AI cut the subject: it usually nails clear edges in 1 pass.
- Switch to Background Remover Generation if we want a new scene (e.g., a cosmetic bottle on glossy plexi or a sneaker on a gradient floor).
For strict ecommerce use (Amazon / Shopify catalog), we usually stick to pure white (#FFFFFF) after removal.
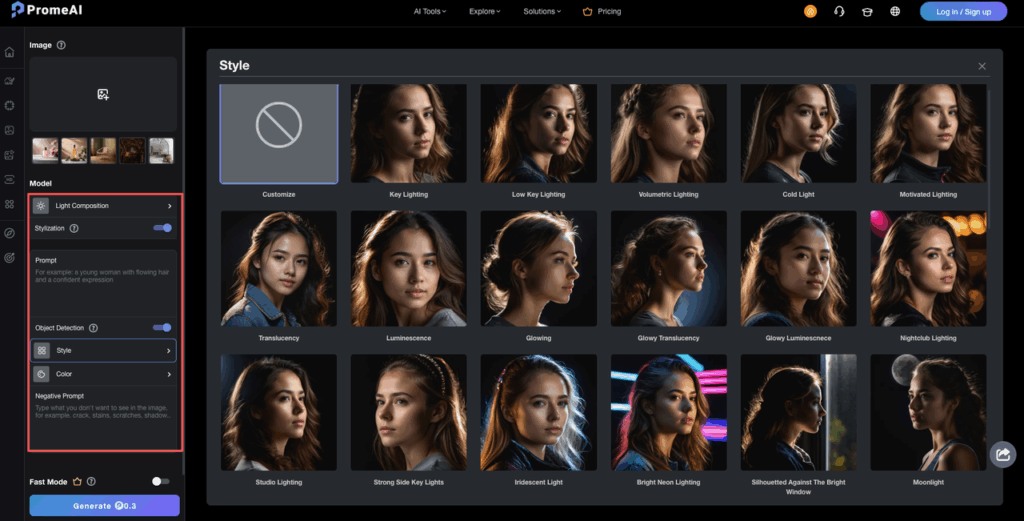
Step 2: Relighting
Once we’ve isolated the product, we move it into Relight.
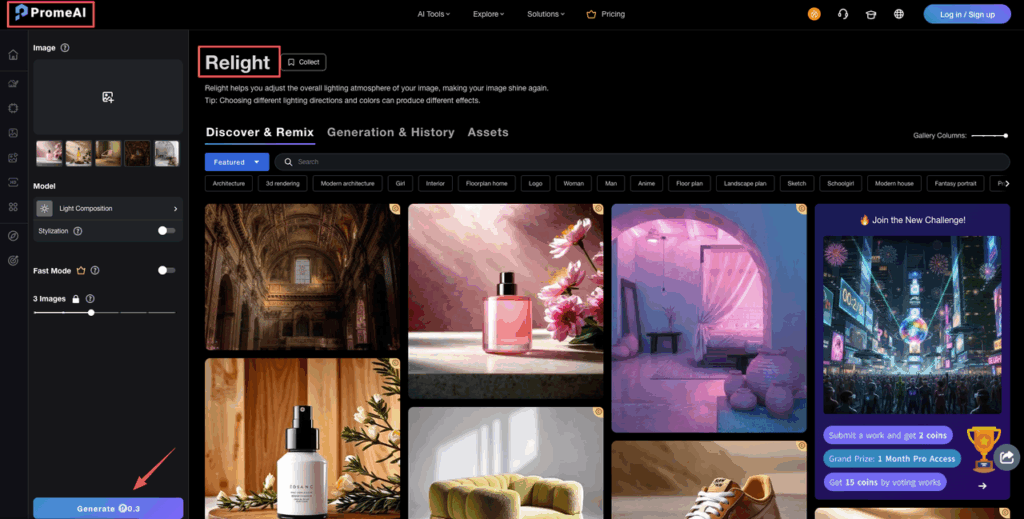
This is where the “we actually had a softbox” look happens.
Baseline preset that works for 80% of products:
- Scene Type: Product
- Lighting Style: Softbox / studio
- Direction: 45° from top-left
- Intensity: 60–75%
Workflow:
- Send the cut-out product into Relight.
- Pick a soft studio preset (more ideas in the Relight section below).
- Adjust intensity until you keep detail in highlights and shadows.
- Check reflections on glossy objects, dial back intensity if the logo starts to blow out.
The goal: mimic that classic studio lighting where edges pop, but nothing feels harsh.
Step 3: Export optimization
Before exporting, we think about where the image will live.
For ecommerce, we typically export multiple versions:
- Master: High-res PNG, transparent background for design work
- Amazon / Marketplace: JPEG on white, compressed
- Shopify / Site: JPEG, optimized size (no heavy files)
- Social: JPEG at platform-specific crops
Export checklist:
- Color Space: sRGB (safer across browsers)
- Format: PNG for layered design work, JPEG for final listings
- Longest side: 2000–3000 px for a flexible master that still stays light
We’ll get into exact platform specs in the “Output Sizes” section so we’re not guessing dimensions.
We’ve shared our exact 3-step workflow; now it’s your turn to verify the results. Upload a product photo to PromeAI, apply the “Softbox” preset, and see if you can beat the one-minute benchmark for a marketplace-ready image.
Background Removal Best Practices
If you feed PromeAI terrible input, it’ll still try, just not in a way your client will approve.
Here’s how we keep product photo editing AI results clean and predictable.
Edge cleanup tips
Even good AI needs help on tricky edges.
We shoot or request source files with:
- Clear contrast between product and background
- Decent resolution (at least 1500 px on the shortest side)
- Minimal motion blur
Inside Background Remover we do this:
- Zoom in to 200–300% around corners and fine details.
- If an area looks fuzzy, run the cut again with a higher-quality source instead of trying to fix a tiny, blurry capture.
- For straight products (boxes, tech gadgets), we sometimes add a 1–2 px feather in our editor to avoid crunchy edges on white.
Hair and transparent objects
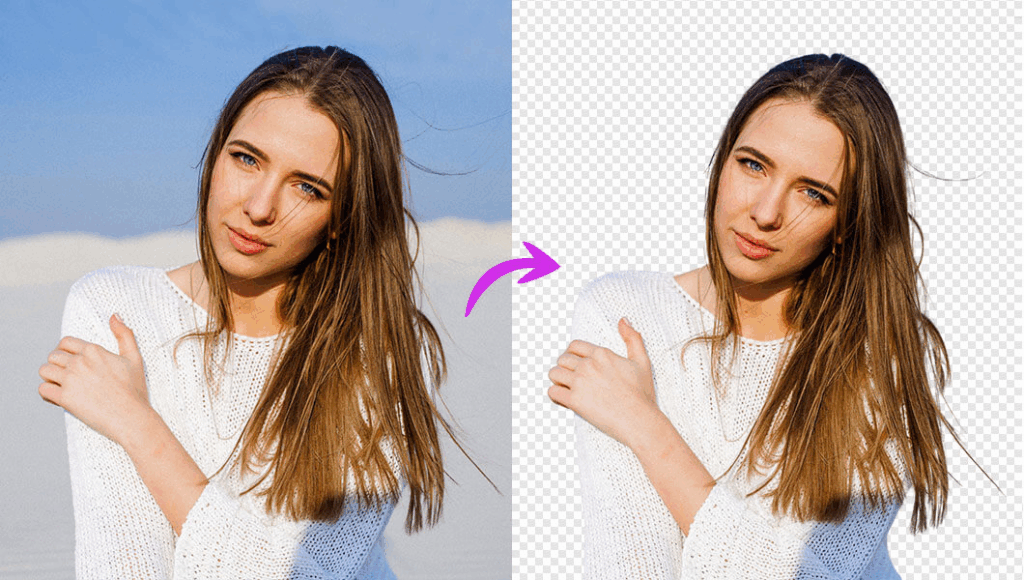
Hair, glass, plastic, this is where most tools look cheap.
In PromeAI, we’ve had good results if we:
- Shoot glass items against a mid-tone background (not white, not black) so the AI can spot the edges.
- Avoid busy reflections on glass, soft, even light works better, then we add more dramatic light in Relight.
- For hair or soft fibers (e.g., apparel, rugs), we keep a bit of the original background halo and blend it on white or neutral gray.
If the cut still looks off, we’ll fine-tune edges manually in our editor just for hero SKUs. For large catalogs, we accept a tiny bit of softness over spending hours per image. For more tips, check out our guide on best AI image background removers.
Relight Presets for Products
Relighting in PromeAI feels a bit like adding seasoning. Too little and it’s bland. Too much and it looks fake.
Here are presets that have worked well across different product types.
Softbox setup
Great for: cosmetics, tech gadgets, packaging, tabletop products.
Our go-to setup in Relight:
- Lighting Style: Studio / Softbox
- Angle: 45° top-left, secondary fill from front
- Intensity: 60–70%
- Shadow softness: Medium-soft
We use this for catalog images that need to look consistent on white.
Cheat sheet settings we reuse:
- Relight Mode: Product
- Key Light: Left 45°, 65% strength
- Fill Light: Front 20–30%
- Background: White or 2–4% gray
Dramatic lighting
Great for: premium packaging, watches, sneakers, dark bottles.
Here we lean into contrast:
- Lighting Style: Hard or directional
- Angle: Side or back 60–90°
- Intensity: 75–90%
- Shadow softness: Harder, more defined
We usually:
- Keep background slightly darker than the product.
- Use a thin rim light to define dark edges.
- Lower brightness on labels so they stay readable.
This is more for campaign assets, hero banners, and social, not strict marketplace listings.
Natural daylight
Great for: home goods, lifestyle accessories, food packaging.
We treat this like “window light on a table.”
Settings that feel believable:
- Lighting Style: Daylight / Window
- Angle: Side 30–45°
- Intensity: 40–60%
- Color temperature: Slightly warm, around 5200–6000K
We pair this with Background Remover Generation to place the product on:
- A light wooden surface
- A neutral stone top
- Soft fabric or linen-style background
The key is restraint. We keep it soft so it doesn’t scream “CGI.” For advanced editing options, you can also explore the Magic Editor tool.
Shadows & Reflections Control
Shadows and reflections are what make a product feel real instead of stickered onto a white square.
In PromeAI, we treat them like separate design elements.
What we usually do:
- Start with a subtle drop shadow, barely visible, just enough to ground the product.
- For bottles, watches, or glossy packaging, we add a soft floor reflection at 20–40% opacity.
- Avoid perfect mirror reflections: real studios rarely look like that.
If the shadow looks wrong:
- Re-run Relight with a slightly different light angle rather than forcing it in post.
- Make sure the shadow direction matches any background we generate (e.g., daylight from the left should create a shadow to the right).
For marketplaces like Amazon that want clean white (their image guidelines are clear about this), we keep shadows short and soft so the product still reads as “floating on white” while having a bit of depth.
Output Sizes for Platforms
We’ve learned the hard way that a beautiful image at the wrong size is still a redo.
Here’s how we export from PromeAI (or our editor after PromeAI) to match common ecommerce platforms.
Amazon requirements
Based on Amazon’s own guidance:
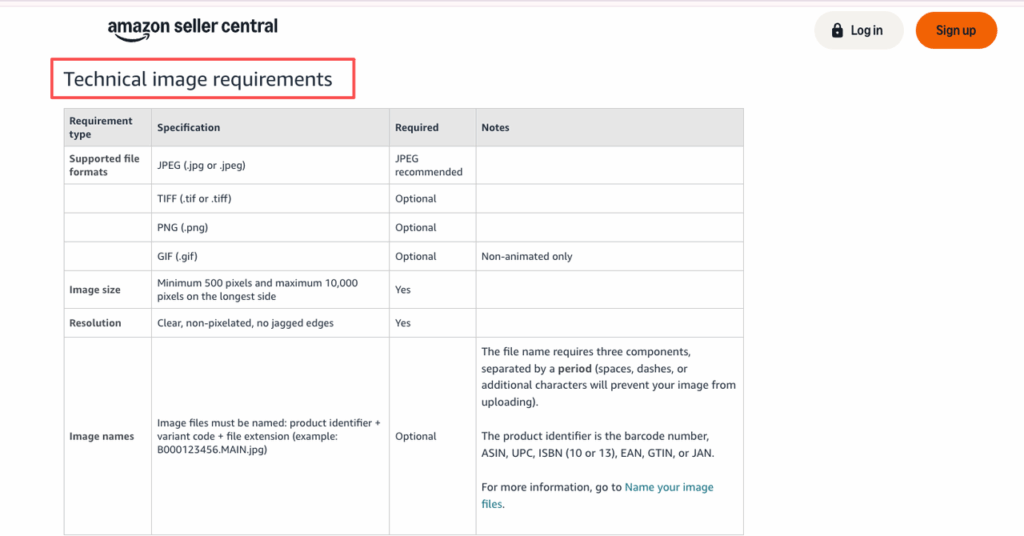
- Image size: Minimum 500 pixels and maximum 10,000 pixels on the longest side
- We usually go 1600–2000 px on the longest side for safety.
- Background: Pure white (
#FFFFFF) for main product images - Format: JPEG
Our Amazon export recipe:
- Size: 2000 × 2000 px square
- Background: White
- Format: JPEG, 80–90% quality
Shopify specs
Shopify is more flexible, but their documentation points to a practical sweet spot:
- Recommended: 2048 px on the longest side for zoomable product photos
- Aspect ratio: We stick to square or 4:5 for consistency
Our Shopify export recipe:
- Master: 2500 × 2500 px PNG (transparent or white)
- Live: 1600–2048 px JPEG for faster page loads
Social media sizes
Social crops change often, but current guidance from resources like Sprout Social gives us a solid baseline.
We usually export:
- Instagram Feed: 1080 × 1350 px (4:5 vertical) or 1080 × 1080 px square
- Instagram Story / Reels cover: 1080 × 1920 px
- Facebook Ads: 1200 × 1500 px or 1080 × 1080 px
From PromeAI, we start with a larger master (2000–2500 px), then crop down for each use. That way we’re not re-running the AI for every format.
Cost Per Image Breakdown
We’ve tested PromeAI on full product batches, not just one-off portfolio pieces.
Here’s how we think about cost.
PromeAI runs on a credit / subscription model (check their current pricing on the PromeAI site, as it can change).
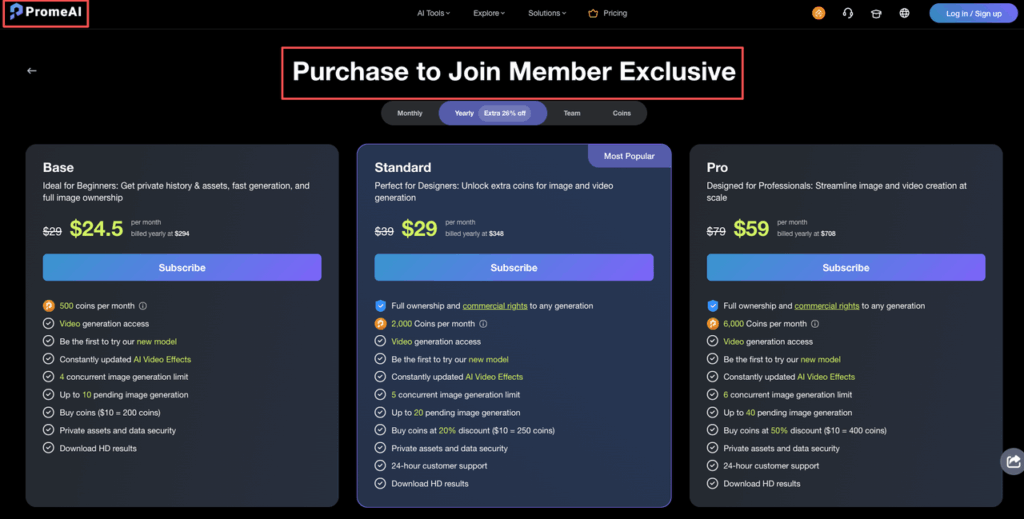
In real use, across a few client catalogs, we’ve seen this kind of pattern:
- Simple background removal only: 1 credit → 1 image
- Background removal + Relight + generated background: Slightly more credits, but still in the “cents per image” range on most paid tiers
Rough, practical math from our side:
- If you’re on a mid-tier plan and running full workflows (remove + relight + export) for volume products, you’re often around $0.05–$0.20 per finished image, depending on your exact plan and how heavily you use generation.
- Compare that with a designer spending 10–20 minutes per image in Photoshop.
Where the value really shows up:
- Large catalogs: Hundreds of SKUs with near-identical angles.
- A/B testing: Quick lighting and background variations without reshooting.
- Last-minute changes: “Can we see this in softer light?” goes from hours to minutes.
We still keep traditional retouching for hero campaigns and super high-stakes shots, but for everyday catalog images, PromeAI gives us a fast, repeatable baseline.
If you’ve tried any similar studio lighting AI tools, you’ll notice PromeAI feels less like a toy and more like a production helper, especially for ecommerce. You can learn more about the platform through the PromeAI tutorial academy or read our comparison with Remove.bg.
So we’re curious: Where do you usually get stuck in your product photo workflow, shooting, cutting out, lighting, or exporting for platforms?
Frequently Asked Questions
How does PromeAI create a studio-quality product photo from a basic shot?
PromeAI turns a flat, poorly lit image into a studio-style product photo in three main steps: AI background removal, relighting with studio-style presets, and export in platform-ready sizes. You upload a single product shot, refine lighting in Relight, then export optimized files for Amazon, Shopify, or social.
What is the best PromeAI workflow for ecommerce product photos?
For ecommerce, a reliable PromeAI workflow is: 1) Use Background Remover in Standard mode and place the product on pure white (#FFFFFF), 2) Send the cut-out to Relight with a softbox/studio preset at 60–75% intensity, 3) Export JPEGs at 1600–2500 px for marketplaces and web.
How should I prepare my images for PromeAI’s background remover to get clean edges?
Shoot products with clear contrast between subject and background, minimal motion blur, and at least 1500 px on the shortest side. In PromeAI, zoom in 200–300% to check edges, re-upload a higher-quality source if they look fuzzy, and optionally add a 1–2 px feather for boxy items.
Can I use PromeAI product photo studio shots for both Amazon and Shopify listings?
Yes. Use PromeAI to create one high-res master, then export multiple versions: 2000 × 2000 px JPEG on pure white for Amazon, and 1600–2048 px JPEG or 2500 × 2500 px PNG for Shopify. Keeping color space in sRGB ensures consistent appearance across browsers and ecommerce platforms.
Is PromeAI cheaper than traditional product photo retouching for ecommerce catalogs?
For volume ecommerce work, PromeAI is typically far cheaper than manual retouching. On mid-tier plans, full workflows (background removal, Relight, generation) often land around $0.05–$0.20 per finished image, versus 10–20 minutes of a designer’s time per shot in Photoshop or similar tools.
Leave a Reply