If you’re looking to integrate the Vidu Q3 API into your app without the usual trial and error, this guide is your exact blueprint. Building scalable video workflows requires more than just pinging an endpoint; you need rock-solid webhooks, secure auth, and smart cost controls. As an AI video strategist who builds custom pipelines for teams, I’m Millie, and I frankly prefer copy-paste checklists over vague theoretical advice. In this breakdown, I’ll hand you the exact production-safe defaults we use to manage Vidu integrations, including how to choose between the official platform and aggregators like fal.ai or Runware. You’ll walk away with a clear architectural roadmap for handling T2V/I2V requests and managing job queues, saving your engineering team days of unnecessary frustration.
Choose an API route (official platform vs aggregators)
If you’re typing “vidu api” into Google, you’re usually in one of two situations:
- We already know we want Vidu quality, but we need it inside a workflow (Figma → storyboard → video tests → approvals).
- We don’t want to babysit a UI. We want an endpoint.
There are two routes:
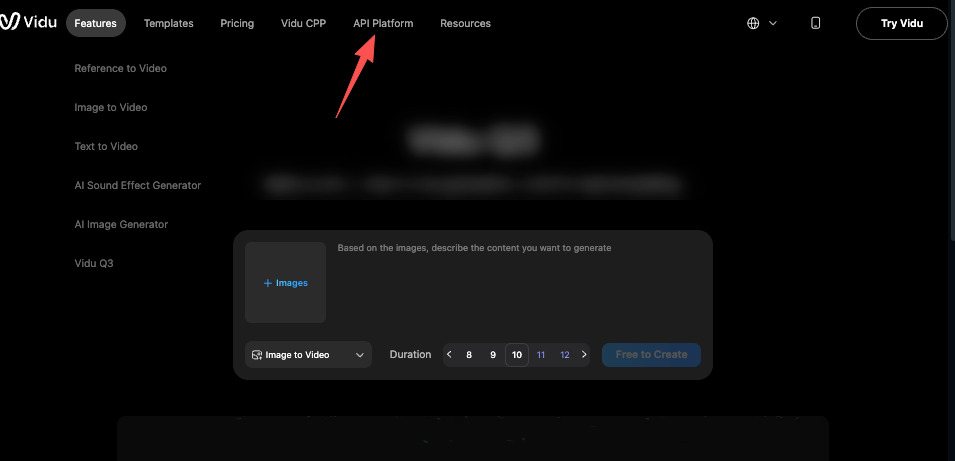
- Official platform API (direct): best if we need the newest features first, want fewer middle layers, and can handle the platform’s account + billing setup. You can get started directly at the Vidu Q3 official platform.
- Aggregators (one API that brokers multiple models/providers): best if we want one integration that can swap providers, compare outputs, or fail over.
Here’s the honest trade:
- Official is often simpler conceptually (fewer vendors). But we own more operational work.
- Aggregators are often faster to integrate across models. But we add another dependency (and another set of limits).
fal.ai vs Runware (when each makes sense)
We’ve used both styles of aggregator setups in production-ish prototypes (think: internal “generate 12 variants” tools).
fal.ai tends to make sense when:
- We want developer-first ergonomics (clean job-based patterns, good docs culture).
- We care about async workflows (queue → webhook callback → fetch result).
- We want to stitch together video with other AI steps in the same stack.
For fal.ai, you can access Vidu Q3 Text-to-Video via fal.ai and Vidu Q3 Image-to-Video via fal.ai directly from their model API docs.

Runware tends to make sense when:
- We’re coming from a creative tooling mindset (fast iteration, easy switches).
- We want a platform that’s built around high-throughput media generation patterns.
- We need a simple way to manage multiple generation types without rewriting our app.
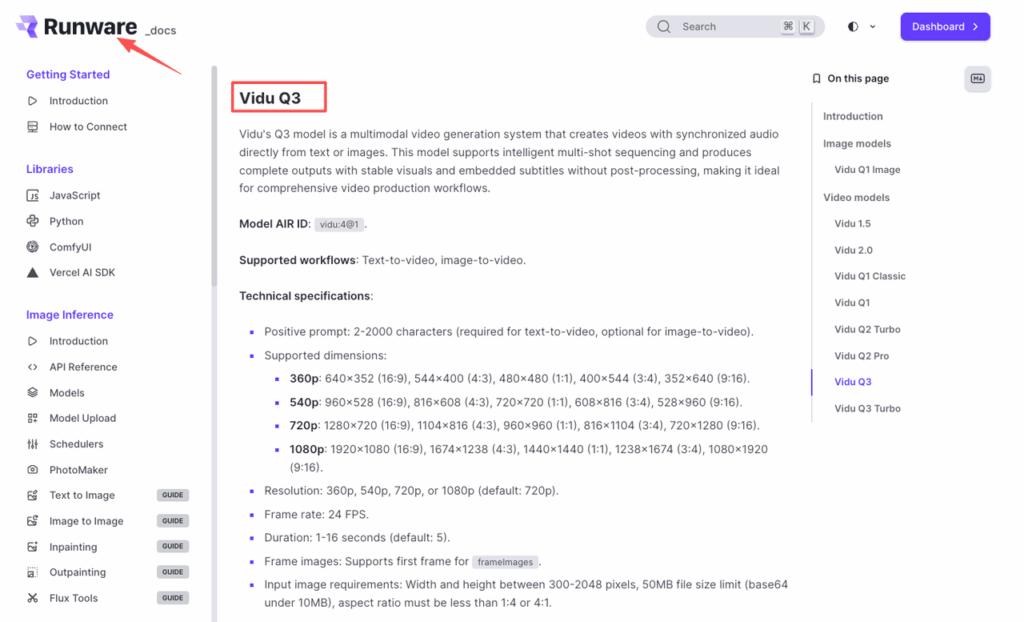
Check out Vidu integration on Runware for their provider-specific documentation.
The quick picker:
- If our team is heavier on product + engineering: fal.ai.
- If our team is heavy on creative ops and needs speed: Runware.
Either way, treat it like choosing a payment processor: reliability + docs + predictable limits beats “it worked once on my laptop.”
Authentication + key safety
This is the part people skip… until someone commits an API key to a public repo and we spend a weekend rotating credentials.
Our minimum safe setup:
- Store keys in a secret manager (AWS Secrets Manager, GCP Secret Manager, 1Password SCIM, etc.).
- Never call the Vidu API directly from the browser.
- Put a thin server in the middle that: validates inputs (size, duration, prompt length), injects the secret key, enforces rate limits + budgets.
You can generate and manage your credentials directly at the Vidu API key management dashboard.
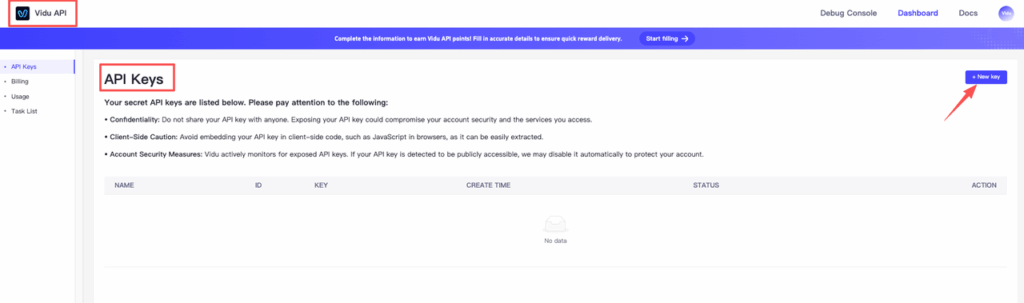
Practical key rules we actually follow:
- One key per environment (dev / staging / prod). If dev leaks, prod doesn’t burn.
- Rotate on a schedule (monthly is a nice default) and immediately after any suspected leak.
- Log request IDs, not secrets. If we need debugging, we log job IDs and timestamps.
If we’re using an aggregator, we’re typically dealing with Bearer tokens for API calls and optional org/project headers.
So we standardize our internal config like:
- PROVIDER=vidu_via_fal (or similar)
- API_KEY=…
- WEBHOOK_SECRET=…
It sounds boring. But boring here is good.
Core endpoints (T2V / I2V / Reference / Start-End)
Most Vidu API workflows collapse into four “shapes.” Before diving in, we recommend reviewing the Vidu API quick start guide to understand how the platform is structured. The exact endpoint names vary by platform, but the mental model stays stable.
We keep a little internal cheat sheet with bolded parameters so designers can request runs without feeling like they’re writing code.
1) T2V (Text-to-Video)
Use this when we’re exploring concepts from scratch. Refer to the Vidu text-to-video API documentation for the full parameter reference.
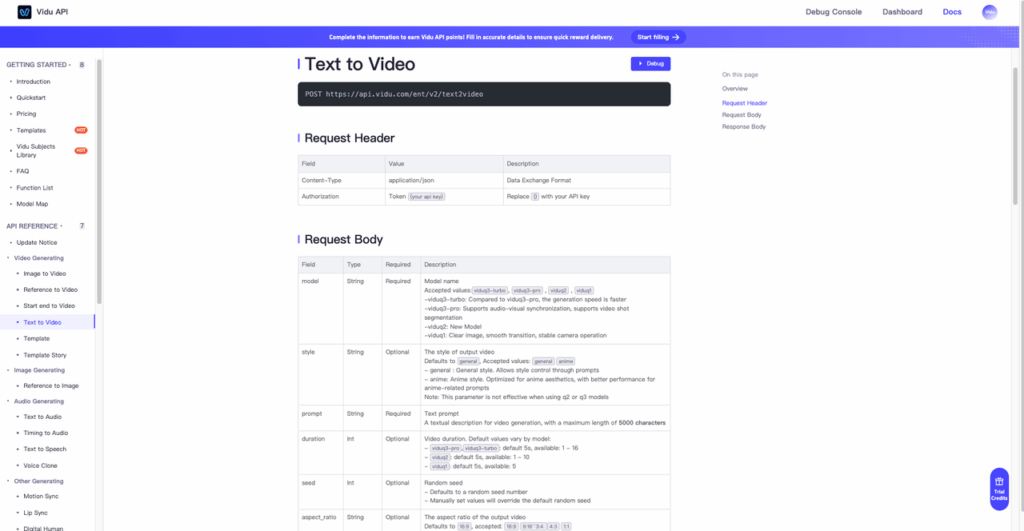
Copy-friendly spec we pass around:
- Prompt: “A clean studio product shot of a matte white smart speaker, softbox lighting, slow 5-second orbit, minimal background, realistic.”
- Duration: 5s
- Aspect: 16:9 (or 9:16 for social)
- Seed: 24680 (so we can reproduce a look)
- Motion strength: medium (too high gets chaotic fast)
Design tip: prompting video is like seasoning. A little motion direction goes a long way: too much and it tastes weird.
2) I2V (Image-to-Video)
This is our go-to for product designers and marketers.
Workflow: we feed a keyframe image (mock, render, or photo) and ask for a short camera move (push-in, orbit, handheld micro-shake).
Parameters we care about:
- Input image: high-res, clean subject separation
- Prompt: “Slow dolly-in, subtle parallax, keep product shape unchanged, natural shadows.”
- Seed: 13579
If faces/hands show up, we keep motion lower. Fingers love to become spaghetti.
3) Reference (style/character consistency)
This is the “please don’t change the brand character every frame” endpoint pattern.
We use it for: keeping a mascot consistent, keeping a product silhouette consistent, keeping a visual style consistent across variants.
Common gotcha: references can overpower the prompt. If outputs feel same-y, we reduce reference strength and add one clear shot direction.
4) Start-End (first frame / last frame control)
This is the designer candy. We can do: start frame = our storyboard frame A, end frame = storyboard frame B, let the model invent the in-between motion.
It’s perfect for UI transitions (screen A → screen B), architectural reveal shots (wide → detail), and ad concepts (closed box → opened product).
We’ve had best results when A and B have consistent lighting and perspective. If the camera angle flips, the model has a meltdown.
Webhooks/callback signature + retries
If we’re doing this “for real,” we need webhooks. Polling works for a demo. But polling at scale is how we accidentally DDOS ourselves.
What we carry out every time: a /webhook/vidu endpoint, signature verification, idempotency (so the same callback doesn’t double-save), retry-safe logic.
For fal.ai-based setups, their webhook documentation covers the full callback signature and retry behavior in detail.
Signature verification (don’t skip this)
We verify the webhook signature using the shared secret from our provider. Even if the provider’s signature scheme differs, the principle is the same as Stripe’s recommended pattern: validate the raw request body against a signature header before parsing JSON.
Retries + idempotency
Assume webhooks will: arrive twice, arrive out of order, arrive late.
So we store: event_id (or equivalent), job_id, status transitions (queued → running → completed/failed).
And we make our handler do this:
- If event_id already processed → return 200.
- If status is “completed” → fetch asset URLs, save once, mark done.
- If status is “failed” → capture error code, show a helpful message to the user.
One more thing: keep webhook responses fast. Do heavy work (downloads, transcodes) in a background job queue.
Usage limits, queues, and failure handling
This is where we stopped guessing and started logging.
Video models queue. Even on paid plans. So we treat generation like a print shop: we submit a job, we get a ticket (job_id), we pick it up when it’s ready.
What we track in our dashboard: time in queue, time generating, fail rate by endpoint type (T2V vs I2V), average retries before success.
Common failure modes we’ve seen across providers: timeouts during peak hours, input too large (image dimensions or file size), safety filters (prompt hits a policy), transient 5xx (provider hiccups).
How we handle it without making designers hate us:
- If it’s a transient error: auto-retry with backoff (ex: 2s, 5s, 15s).
- If it’s input-related: show the fix in plain English (“Image is 12MB: max is 5MB. Export JPG at 80%.”)
- If it’s safety-related: we prompt-edit with the user (“Try removing brand names or swapping ‘real person’ for ‘actor’.”)
And we always give a fallback: “Download the last successful render” so work doesn’t stop.
Cost controls (rate limit, budget caps, batching)
If we don’t add cost controls, the first time someone discovers “generate 40 variations” is the first time finance discovers us.
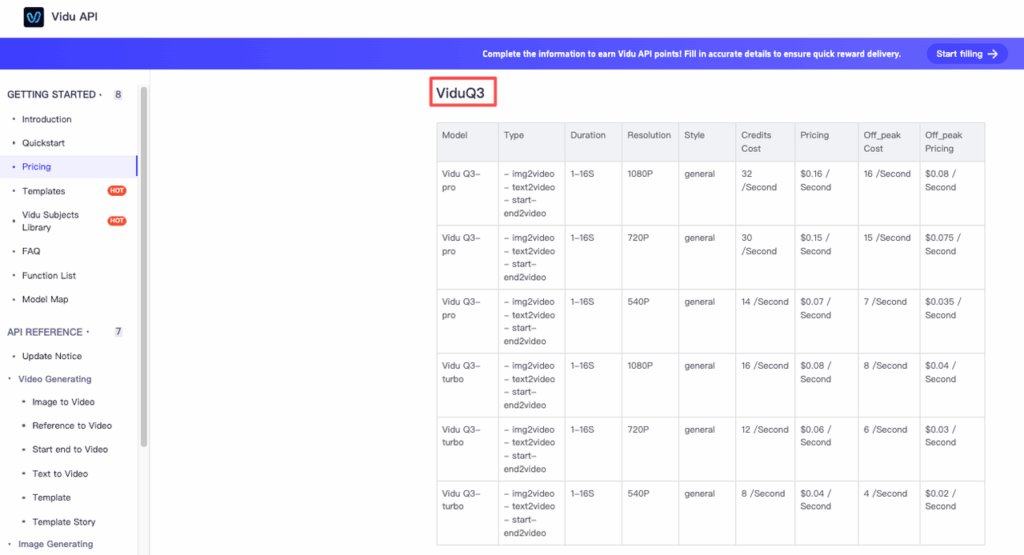
Before building, always check the Vidu API pricing page so your budget caps reflect accurate credit costs per generation type and duration.
Here’s what we put in place on day one.
Rate limits (protect the provider and our wallet)
We add a server-side limiter per user/team: max requests per minute, max concurrent jobs. Even a simple cap like 3 concurrent jobs per user keeps queues sane.
Budget caps (the grown-up feature)
We set: a daily team budget, per-user soft limits, alerts at 50%, 80%, 100%. This turns “surprise bill” into “we saw it coming.”
Batching (cheaper and easier to review)
Instead of letting people spam single generations, we encourage batches: submit 6–12 variations in one go, hold Seed constant for controlled comparisons, vary one thing at a time (camera move OR style OR prompt).
A batch review is also just nicer: designers pick top 2, we upscale/refine only the winners.
Last thing, if we’re building an internal tool, we add a “cost hint” right in the UI: “This run is ~X credits / ~$Y.” People behave differently when they can see the meter.
Stop guessing with rate limits and start building workflows your team can rely on. With PromeAI, we give you the endpoint stability needed to process bulk video variations without breaking your budget. Run your first test and measure the difference in generation times.
What’s the part you usually get stuck on with a Vidu API workflow, auth, webhooks, or the ‘why is this run taking forever’ queue problem?
Frequently Asked Questions (Vidu API)
What is the Vidu API, and what do people use the Vidu API for?
The Vidu API is an endpoint-based way to generate videos from text, images, or reference frames inside a workflow. Teams use the Vidu API to avoid babysitting a UI and instead run fast iterations (storyboards, variant testing, approvals) with job IDs, async processing, and automated result retrieval.
Should I use the official Vidu API or an aggregator API for Vidu?
Use the official Vidu API if you want newest features first, fewer middle layers, and you can manage direct billing and ops. Use an aggregator if you want one integration that can swap providers, compare outputs, or fail over—accepting an extra dependency and its limits.
How do fal.ai and Runware compare for Vidu API access?
fal.ai fits product/engineering-heavy teams that want developer-first ergonomics and async job patterns (queue → webhook → fetch result), plus easy chaining with other AI steps. Runware fits creative-ops teams optimizing for speed, high-throughput media patterns, and quick switching across generation types without rewriting.
How do I keep my Vidu API key safe in a real app?
Don’t call the Vidu API from the browser. Put a thin server in front that validates inputs, injects the secret, and enforces rate limits and budgets. Store keys in a secret manager, use one key per environment (dev/staging/prod), rotate regularly, and log request/job IDs—not secrets. Manage your keys at the Vidu API key dashboard.
What are the core endpoint types in a typical Vidu API workflow (T2V, I2V, reference, start-end)?
Most Vidu API usage falls into four patterns: Text-to-Video (T2V) for concept exploration, Image-to-Video (I2V) for animating a keyframe with a camera move, Reference for style/character consistency, and Start-End to control first/last frames and let the model generate in-between motion.
Recommended Reads
Leave a Reply