Introduction
Poor video quality (blurry images, pixel frames), inappropriate lighting conditions can ruin the whole experience of a viewer, even despite a brilliant piece of content you can offer. Regardless of whether it is your vlog, product showing, tutorial, or short-form video, you would want it to be good. But what if you do not have professional gear or high-end cameras? That is where the AI Video Upscaler of CapCut Desktop Video Editor comes into play.
CapCut will allow you to enhance the video resolution with one click, owing to its superb AI features. It can be combined with such tools as an AI voice generator and other intelligent editing functions to turn footage of poor quality into a highly presentable result that should be shared.

Why Use CapCut’s AI Video Upscaler?
With CapCut Desktop Video, you can automatically increase the visual quality of your clips with its AI Video Upscaler, increasing your standard definition videos to high-definition (HD) or even 4K quality. The AI fills in gaps in visual information, smoothens the pictures, and removes noise without ruining natural colors and texture.
This tool can revive any existing old footage, phone records, as well as low-resolution stock video to make it ad-ready, be it YouTube, Reels, TikTok, or a client presentation.
Combine it with such tools as the AI voice generator to not only repair the images but also enhance the sound output.
Benefits of Using CapCut’s AI Video Upscaler
The AI Video Upscaler, designed in CapCut, does not act as a superficial sharpness filter, but as the intelligent result of learning video frames and computer vision models, enhancing the quality of the video intelligently without losing the natural effect of the details. Some of the main advantages are the following:
1. Time-Saving Automation
The AI does all these adjustments (brightness, contrast, and sharpness) frame by frame; it takes seconds compared to the patience of doing these adjustments frame by frame. This goes a long way in accelerating your editing process.
2. Professional-Level Results Without Expensive Tools
The upscaler may help you make the footage commercially presentable, even though you operate on the budget level of smartphone and webcam recordings, to be able to use the venue of high-quality renditions such as YouTube, TikTok, or Instagram.
3. Perfect for Repurposing Old or Low-Quality Content
Have old out of date clips you wish to use again? They are something that the AI Video Upscaler can resurrect: it cuts down on the noise, reinstates coloring, and adds details, making it possible to incorporate them in new creation projects.
4. No Editing Experience Required
In comparison to the traditional tools of video editing, which require special skills, the upscaling using CapCut is a piece of cake: a switch. It is perfect for the newbies and busy individuals.
5. Works Seamlessly with Other AI Tools
Combine it with text-to-speech to narrate, an AI video generator to create videos automatically, or the AI voice generator to have a voice overs voice in the same project.
Step-by-Step Guide: How to Use AI Video Upscaler in CapCut Desktop
Here’s how to use this feature the right way inside CapCut Desktop:
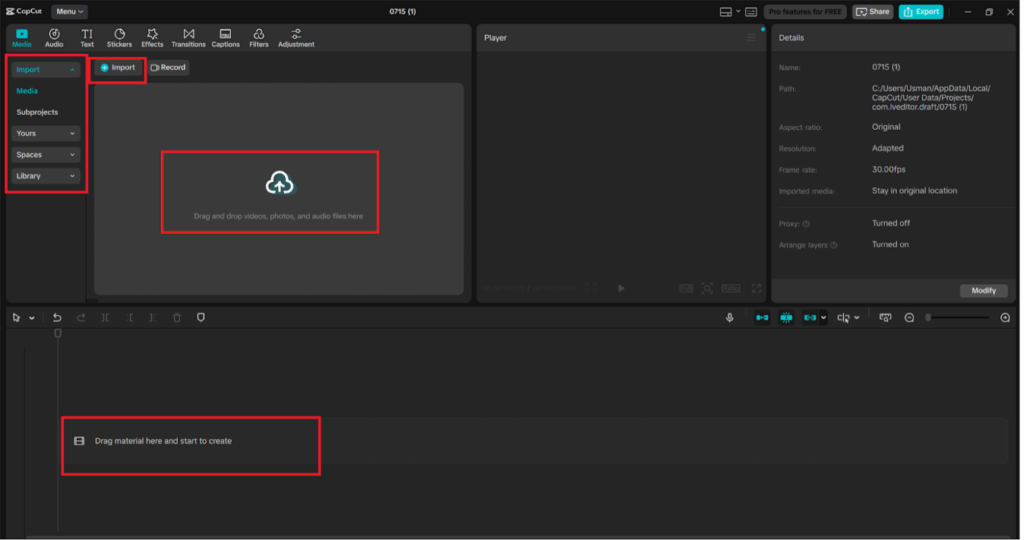
Step 1: Open CapCut and Import Your Video
Open CapCut Desktop, and then press the “New project” button on its start screen. To insert a video file you wish to upscale, click “Import” in the “Media” panel that is located on the left side of the screen. To edit it, drag and drop it onto the timeline.
After it has been dropped in the timeline, finally click on the clip when it has been identified. This brings up editing settings in the right-side panel.
Step 2: Use “Enhance Quality” in the Video Panel
Once your video is on the timeline, click on the clip to select it. On the right-side panel, make sure you’re in the “Video” tab.
Scroll down until you see the “Enhance quality” section. Enable it by clicking the toggle. CapCut will begin enhancing your image automatically. You’ll see a progress bar labeled “Enhancing image quality…” as the AI processes the clip.
You can also adjust the enhancement Level from the dropdown menu—options include UHD (Ultra High Definition) for best quality output.
This built-in AI feature helps sharpen visuals, clean up blur, and upscale footage to higher resolutions—ideal for improving smartphone or low-resolution recordings.
Step 3: Preview and Fine-Tune Your Enhanced Video
Click on the Preview Window to show the real-time appearance of the upscaled video. It can be too harsh or not look natural enough in case; you can switch off the particular enhancement layer.
This would also be the perfect time to improve the audio of your video. In case the original video sounds are unclear or muffled, replace it with a narration created with the help of the CapCut tool that allows adding text-to-speech. Simply go to the tab and press “Text” > “Text to speech”, paste your script, and have your voice-over recording done in the style you want.
This brings professional-level narrating without a recording of your voice.
Step 4: Insert Transitions, Effects, and Captions
Give your videos an upscale, and produced voice over, and go to the top tabs:
“Transitions”: To butter the scene between cuts
“Effects”: To insert filters or moving images
“Captions”: Take on the feature of auto captions, where your audio or voice recording automatically gives subtitles
It provides these finishing touches that will help to improve the quality of production of your video.
It is also possible to use the audio library to add royalty-free background music and maximum involvement.
Step 5: Export Your Upscaled Video in HD or 4K
When you are happy with your markup, press the button marked “Export” in the upper right.
Select optimal settings of the target platform:
Resolution Full HD 1920×1080 or 4K 3840×2160
Frame rate: 30 FPS or 60 FPS, according to your video footage
Format: MP4 is most suitable for most sites
To save your video, click the button labeled with the word “Export” once again. The low-res videos that you had are now converted and made to share.
Conclusion
Poor quality videos should not deter you from relaying the best stories. Using the AI Video Upscaler of CapCut, editors (irrespective of their expertise) could now instantly improve their video recordings and create high-quality, interesting videos.
Along with such tools as the AI voice generator that can be used in voicework, text to speech AI as a text-to-speech generator, and the AI video generator, which popularizes the creation of video content, CapCut can become not only a video editor but also your comprehensive assistance in the creative process.
Bringing nothing exceptional, no need to capture and re-shoot the content or spend cash on costly equipment, upscale, improve, and export.
Leave a Reply