What if I told you that you could rent a full photography studio, hire a lighting tech, and get the perfect softbox look—all in about 15 seconds? That’s the power of the new PromeAI Relight workflow. I recently dropped a poorly lit, amateur product shot into the tool, typed a quick prompt, and watched it transform into a studio-grade photo lighting masterpiece without a single C-stand or light meter in sight.
I’m Millie, and I like tools that actually work in production, not just in demos. Below, I’m skipping the fluff and handing over my personal “Lighting Prompt Cheat Sheet”—the specific settings and prompts that turn PromeAI from a toy into a professional design weapon.
Lighting Prompt Cheat Sheet
We’ll skip the theory and go straight to the stuff we actually type into PromeAI Relight.
These work across portraits, product shots, and room renders. Think of them as presets you type.
Softbox setup
Softbox lighting is the “clean beauty ad” of studio lighting ai: soft, even, very client‑friendly.
Use this when:
- You’re relighting products for ecommerce
- You want clean, minimal, “Apple store” energy
- You need to remove messy mixed light from the original photo
Prompt starter for softbox lighting
Lighting prompt: studio softbox lighting, large softbox 45 degrees to the left, subtle fill from the right, neutral white background, soft shadows
Dial it in with:
- Light direction: swap 45 degrees to the left with directly in front or top-front if you want more catalog-style flat light.
- Softness: add very soft diffused light, no harsh shadows when you’re dealing with skincare, packaging, or shiny plastics.
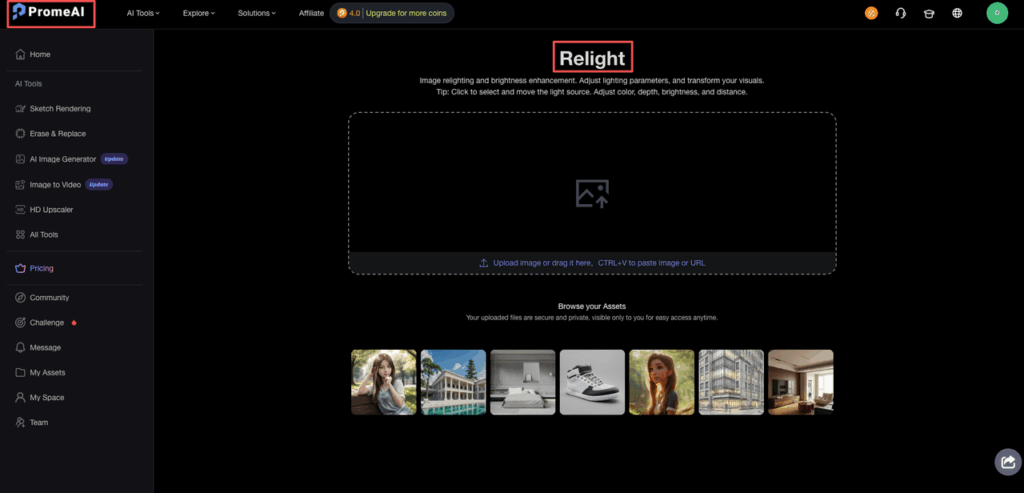
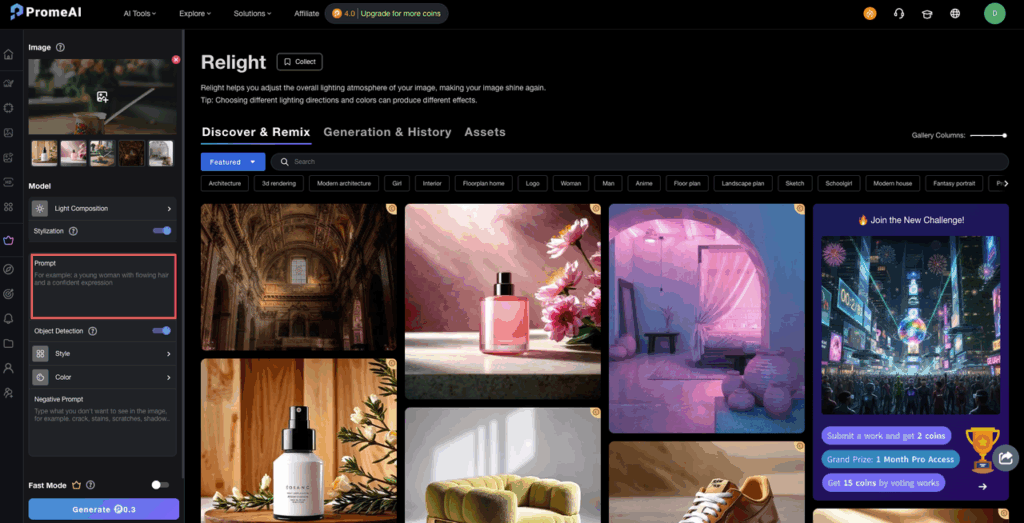
On PromeAI’s Relight Image page (official guide here), we’ve had the best luck with:
- Intensity: 40–65 for products, 30–50 for faces
- Relight area: shrink the mask so the background doesn’t get too washed out
Rim light
Rim light is that thin glow on the edge of an object or person that separates them from the background. It’s subtle, but it screams “studio”.
Use this when:
- You want products to feel more premium in ads
- You’re working on dark backgrounds and things are blending in
- You want a bit of drama without going full cinema
Prompt starter for rim light
Lighting prompt: studio rim light from behind, subtle edge glow on left and right, main soft key light in front, dark background, contrasty look
Tips:
- If the rim light is too strong, add subtle or very soft to the rim part of the prompt.
- To make metals pop (headphones, watches, tools), add emphasize metallic reflections.
This matches what a lot of photographers do physically with strip lights or backlights (Petapixel had a great piece on AI relight tools doing similar tricks). We’re just faking it after the fact.
Natural window light
Sometimes clients don’t want “studio,” they want “shot in a cool loft at 3pm.” We fake that with a window-light style relight.
Use this when:
- You’re doing interiors or architecture renders
- You want lifestyle product shots that still look designed
- You’re trying to match photos from an actual shoot
Prompt starter for natural window light
Lighting prompt: soft natural window light from the left, gentle falloff, slight warm tone, indoor afternoon light, soft shadows
Helpful tweaks:
- For cooler tech look: cool daylight window light, slightly blue tone
- For warmer lifestyle: golden hour window light, warm highlights, soft ambient fill
PromeAI’s own Relight page leans into this use case for interiors (see their relight demo examples). We’ve had success on room shots by:
- Lowering intensity to 25–40
- Keeping realism higher (we’ll talk about that next) so textures on walls and furniture stay believable
Dramatic shadows
This is the “hero shot” setting. Strong shadows, big mood.
Use this when:
- You’re doing hero images for campaigns
- You want slides for a pitch deck that actually look like a campaign
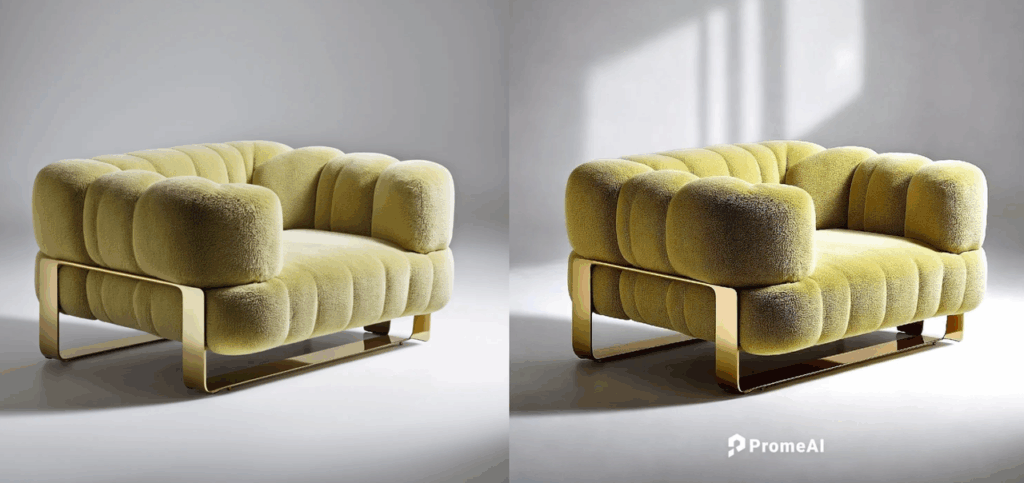
- You’re working with bold shapes: chairs, speakers, packaging cubes
Prompt starter for dramatic shadows
Lighting prompt: single hard light source, strong directional shadows, cinematic studio lighting, high contrast, dark background
To avoid turning everything into a harsh mess:
- Add soft fill from the opposite side if one side goes too dark.
- Add keep detail in shadows to keep black areas from crushing.
Think of prompting like seasoning food. Strong directional shadows is your salt: soft fill is the squeeze of lemon that stops it from being too heavy.
For deeper theory on dramatic lighting, Adobe’s Lightroom AI team gives some nice examples of how shadows shape mood in their feature writeup. We’re chasing a similar vibe here, just with ai relight instead of sliders.
We’ve handed over the cheat sheet; now it’s your turn to test the output. Copy these specific lighting prompts into PromeAI Relight and see if you can replicate that studio-grade finish on your own raw images. Start experimenting for free.
Realism Settings
PromeAI’s realism controls are where things go from “this is sick” to “ok that’s a 3D render wearing human skin.” We learned this the hard way.
On the Relight tool, think of realism as a spectrum:
- Low realism: more stylized, more plastic risk
- High realism: more like traditional photo editing
After testing a bunch of shots (people, products, interiors), here’s where we usually land.
- Portraits: Realism 70–90
- Products: Realism 60–80
- Rooms / architecture: Realism 80–100
That lines up with what photographers call “keep the base image, enhance the light”, similar to what DIY Photography talks about in their AI lighting tests.
Avoiding over-processing
You know that weird “plastic doll” vibe? That’s often realism set too low plus too much light intensity.
Our quick rules:
- Don’t max both sliders. If intensity is 70+, keep realism high (80+).
- Check textures. Zoom in on skin, fabric, and wood grain.
- If pores or texture vanish, bump realism up or reduce intensity.
For a safe baseline:
- Start with realism 80, intensity 40
- Make small changes: +10 intensity or −10 realism at a time
Also, less relight area usually means more realism. We often:
- Mask just the subject for portraits
- Mask product + table, but skip background, for ecommerce shots
This helps keep things grounded instead of turning everything into a brand new scene.
Common Issues
Every ai relight tool has quirks. PromeAI is better than most we’ve tried, but it still has “oh wow, nope” moments.
Here’s what we keep running into and how we fix it.
Plastic skin fix
Problem: Faces look too smooth. Skin looks like it went through three beauty filters.
We’ve had this happen most with:
- Beauty shots with softbox lighting
- Low‑res original photos
- High intensity plus low realism
Our fix combo:
- Dial realism up. Move realism to 85–95.
- Drop intensity. Pull intensity down to 30–45.
- Change the prompt wording. Swap beauty lighting or perfect skin with:
- natural skin texture
- subtle studio lighting, keep pores and fine details
- Mask less of the face. Leave hair and background in the relight, but keep the facial area closer to the original.
We’ve found that adding “keep original skin texture” in the prompt works surprisingly well. Lightroom’s AI tools use a similar idea: enhance, don’t replace (Adobe Lightroom AI overview).
Over-glow reduction
Problem: Objects and people get a weird halo. Highlights look like someone cranked the “glow” slider.
We see this a lot with:
- Strong rim light prompts
- High‑contrast dramatic shadows scenes
- Bright backgrounds
Our fix steps:
- Tone down words like strong and intense. Replace them with subtle or just remove them.
- Lower intensity first. Bring it under 50 and see if the halo calms down.
- Switch to smaller light source wording:
- narrow beam light
- small key light
- Use in-paint or a second pass. Light the subject first, then run a second gentle relight just on the background.
DIY Photography’s tests show how easy it is for AI to blow out highlights (their lighting article). Same rule here: protect highlights, add drama later.
If it still looks too dreamy, we’ll often:
- Re‑run with a natural window light prompt instead of rim light
- Then add contrast manually in our usual editor (Photoshop, Lightroom, Figma filters, whatever we’re already in)
Product vs Room Relight
We use PromeAI Relight very differently for product relighting vs room relighting. Same tool, very different brain.
Different approaches
For products (bottles, hardware, gadgets):

We treat it like a virtual studio:
- Prompts we lean on:
- studio softbox lighting, seamless background, soft shadows
- studio rim light for product edges, dark background, premium look
- Settings:
- Realism 60–80 (a bit of stylization is fine)
- Intensity 40–65
- Masking:
- Tight mask around the product and maybe the surface it’s on
This is where studio lighting ai really shines. You can get that “shot in a controlled studio” look from something that started out as a quick desk photo. PromeAI’s blog has a nice overview of similar use cases (their AI relight tools round‑up).
For rooms (interiors, architecture, sets):
We treat it more like retouching than rebuilding.
- Prompts we lean on:
- soft natural window light, interior, keep realistic shadows
- balanced room lighting, gentle ambient light, natural look
- Settings:
- Realism 80–100 (we want surfaces to stay believable)
- Intensity 25–45
- Masking:
- Larger area: walls, main furniture, floor, but avoid tiny decor pieces
For room shots, small lighting lies are fine. Big ones break the image. So we let the original lighting do 70% of the work and use ai relight as a strong nudge.
If we had to boil it down:
- Products: treat PromeAI like a virtual softbox rig.
- Rooms: treat it like smart dodge and burn.
Officially, PromeAI positions Relight for both cases (see their academy tutorials and Relight page), and in our tests it lines up with that: playful enough for experiments, solid enough for client work as long as we watch realism and texture.
We’ve been stress‑testing this in our own workflows for decks, moodboards, and quick mockups, and honestly it’s starting to feel as normal as changing the browser you use.
Now we’re curious:
Where do you usually get stuck with lighting – products that never feel premium enough, or rooms that always look a bit fake after editing?
PromeAI Relight Studio Lighting FAQs
What is PromeAI Relight studio lighting and when should I use it?
PromeAI Relight studio lighting is an AI tool that lets you virtually re-light existing photos and renders. Use it to turn badly lit product shots, portraits, or interiors into polished “studio-style” images without reshooting, especially for decks, client PDFs, ecommerce and campaign mockups.
How do I get a clean softbox studio look in PromeAI Relight?
Use a prompt like: “studio softbox lighting, large softbox 45 degrees to the left, subtle fill from the right, neutral white background, soft shadows.” For products, set intensity around 40–65 and realism 60–80, and tighten the relight mask so the background doesn’t get too washed out.
What are the best PromeAI Relight settings to avoid plastic skin and over-processed faces?
Keep realism high (around 70–90) and avoid maxing intensity. If skin looks plastic, raise realism to 85–95, drop intensity to 30–45, and add wording like “natural skin texture, subtle studio lighting, keep pores and fine details.” Mask less of the face so more original texture stays.
How can I use PromeAI Relight studio lighting differently for products vs room interiors?
For products, treat PromeAI Relight like a virtual studio: softbox or rim light prompts, realism 60–80, intensity 40–65, tight mask around the item. For rooms, think gentle retouching: natural window-light prompts, realism 80–100, intensity 25–45, broader mask over walls and main furniture only.
Can PromeAI Relight replace a traditional studio lighting setup for professional work?
PromeAI Relight can’t fully replace a controlled studio for high-end final photography, but it’s extremely effective for upgrading existing shots, testing lighting directions, and creating pitch-ready visuals. Many teams use studio lighting AI for mockups, decks, and concept visuals, then shoot key assets in a real studio later.
Recommended Reads
Leave a Reply